Top: In-game model
Bottom: My prop
After 3D printing the Thorn hand cannon, I started work on making molds.
Ok ok! I will already!
Here's the 3d printed version that I finished out for Halloween (2013)
Here, I've taken it apart and started the long and tedious process of sanding, filling, and priming. The idea was to get the best finish I could for the molding process.
Filling:
More filling:
Priming, sanding, and more filling:
Finally, the parts have a nice smooth almost flawless finish.
For the mold-making process, I will take a more instructional approach:
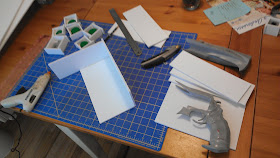
The grip and barrel sections of the gun required two-part molds. You start by making a mold box. I used foam core.
Next you use clay to build up to the mid point of the part. It's important to make the clay as level as you can, and make sure the seam where it contacts the part is nice and smooth. If it's not, you risk getting an obvious parting line in the cast which you will have to sand down.
For the barrel section, I cut out some "risers" so that I didn't have to use so much clay. I used Chevant soft, which is an oil-based sculpting clay which never hardens.
Almost ready for silicone. You can see on the grip section that I've got some thin ridges along the surface of the clay. I am creating exhaust ports so that when I pour the resin into the mold, air bubble can be released. You want to add them to any spot where, when you have the mold sitting upright in it's pouring position, air bubbles won't get trapped on "ceiling" surfaces. I also poked shallow holes all over the clay. This creates registration keys for the silicone so that both mold halves fit together perfectly.
For the cylinder pieces and the muzzle, I used simple, one-part molds. You make a box, glue the flat side down, and fill the box with silicone.
Now let's mix some silicone.
It comes in Part A and Part B, and they have to be weighed carefully. If you're off on your amounts, the silicone may never (ever) cure and you will have a mess and likely a ruined part.
Oooh pretty...
Since I don't own a vacuum chamber, I avoid air bubbles in the silicone by pouring thin and high. Since silicone moves very slowly, I've "automated" the process.
The silicone cures in about 10-24 hours (depending on brand or type). This Tap Plastics silicone took about 8 hours.
After the silicone is cured, we take the box apart, flip the mold, removed the clay, and box it back up again.
Removing the clay sucks. No one ever really covers that part in their tutorials. It's a slow and tedious task. You need to make sure your part is 100% clean or it will show up in the mold. To help, use rubbing alcohol which will dissolve the clay a bit.
Here, you can easily see the exhaust ports and the pour hole. You leave this clay in (or else the second silicone pour will just fill it in!)
Now the molds have been boxed back up and we're ready for the second part of the mold.

The molds are complete!

Since silicone is all floppy, we need something rigid to support the mold, and hold the two halves together when we pour the resin. I used some plexi-glass, and some other white, plastic boards (sintra I think?)

Ready to pour urethane resin.

Since the grip part is relatively thin, I decided to pour it solid. Plus, it gives some weight to the back of the gun. Here's what it looks like when the resin is cured. Those exhaust ports will be trimmed off.
For the barrel section. I needed to slush cast it. Pouring it solid would be a waste of resin and make the prop too heavy. I pour small amounts of resin into the open mold, and tilt, and rotate the mold to coat all the surfaces. After a few initial coats, I close up the mold, and pour in a few more small amounts to make sure the walls are thick enough.

Here, I've started assembling the cylinder pieces so that it can be spun and flipped out.
Sometimes, I work on multiple props at once:


Here we have several Destiny props in various stages of completion.

News of creating the prop along with the Hunter costume kinda caught on for a few days:
Thorn was also taken overseas for a Sony event of some kind (I wasn't there), and the TSA was a little thrown off by it:
And here, I'm facing off against Deej, Bungie Community Manager:
Thorn was also taken overseas for a Sony event of some kind (I wasn't there), and the TSA was a little thrown off by it:
And here, I'm facing off against Deej, Bungie Community Manager:


Can I buy this?
ReplyDeletersloan76@gmail.com
DeleteSeriously how much would you want for one of each, been looking at making a hand cannon from 2 Nerf guns but this is just awesome.
ReplyDeletersloan76@gmail.com
DeleteCan I buy this one?
ReplyDeleteWould you be willing to share the stl file with me? I just printed another design of thorn myself, but I like yours better since you've accounted for the moulding process. I'd post a picture of it but I'm not sure the site has that feature. Thanks for walking us through the process you have some good ideas that will save me some time. turpulent@gmail.com
ReplyDeleteI don't have the STL files for these anymore. I made these props while I was working at Bungie from the original high-poly 3D files from the game. Sorry.
Delete